01 October, 2013
14 April, 2013
Furlex maintenance and new furling line
We recently ordered new Samson line for our genoa furler. During the line replacement, we did maintenance on the Furlex system, which included cleaning and adding lubricant to the bearings.

- old line

- new line


26 January, 2013
Rigging survey finding – undersized pin
We had a rigging survey done in 2011
and one of the findings was an undersized pin in two of our lower shroud
turnbuckles. In order to resolve the
finding we measured the chainplate hole diameter and did some research.
These were the measurements:
Pin
size = 1/2 inch diameter
Chainplate
hole size = 5/8 diameter
Width
of Tang (inside) = 3/4 inch
I
went to a local machine shop and even though they could make the part for me
for approximately $100, they recommended that I check McMaster-Carr’s website
to see if they had a small stainless steel bushing that would right-size the
pin to the turnbuckle eye. Sure enough,
they had the exact size bushing that I was looking for. We ordered two of them.
Before
I took the turnbuckle apart to put the pin in, I taped the location of the
turnbuckle so I would know where it should be when I was finished. I coated the pin with Lanacote, even though
the bushing and pin were of similar metals.
They fit perfectly together. I
tightened the turnbuckle to its original position and satisfied the survey
finding.
 |
| Before bushing was added |
 |
| After the bushing was added |
10 January, 2013
Rainy Day Fun - Turk's Head knot
We put a Turk's Head knot on our wheel. The Turk's Head is used to indicate the rudder is centered. This is especially handy at night, or when you want to hold your attention elsewhere.
 We learned how to make the Turk's Head from Animated Knots: http://www.animatedknots.com/

29 December, 2012
Boat survey finding – Navtec turnbuckle screw
The Caliber 40LRC has convertible
cutter rig. This means that the inner
forestay can be rigged aside when not in use.
The Navtec inner forestay has an adjustable screw (Navtec 1/2"
Standard Screw 8.39") that needs
to be replaced, according to the boat surveyor, every six years. Our inner forestay screw was ten years old so
we decided to satisfy the survey finding by replacing it. We found the exact match to the adjustable screw
through RiggingandHardware.com. They are
great to work with.
Since the inner forestay is
removable, this was an easy replacement.
We added a small amount of Lanacote to the screw when replacing. Total replacement time was one hour.


25 December, 2012
Lazarette Latch
The lockers (lazarettes) in our cockpit have horrible latches that "bite" you every time you walk by them because of the way they protrude, especially when they are left open. After our trip North last summer, we decided to research flush mount latches so we could walk by them safely. Geralyn found lockable latches made by Southco. We mounted one of them over the weekend and it worked great. The latching mechanism needs a little tweaking to work in a lazarette versus a regular door, still, they are much safer than the original boat latches.
 |
| Ankle Biter |
 |
| Calf Bruiser |
 |
| Friendly Latch |
Happy Holidays!!

We added some 12v lights to the cockpit. It makes things a little brighter. Happy Holidays!
20 December, 2012
Fixing a Jabsco Water Pump
Our Jabsco PAR-MAX water pump started going off intermittently for about a second, every hour or so. We looked high and low for a slow leak in the water system, but we didn't find any leaks. I wrote Jabsco with the symptoms, and they wrote right back telling me the cause. Apparently the check valves inside the pump failed. They sell a kit to fix it (18911-7030 ) for $25.00. I bought the kit and fixed the pump. A new pump would have been $150.00.


Anchor Securing Turnbuckle
During our trip up north, the anchor came loose while Geralyn was steering into the big waves. Just kidding about Geralyn steering into the big waves. The anchor did come loose though, when we dipped the nose in the water. Luckily we had secured the anchor with some rope, so it didn't go very far. Since then, we have been thinking about a way to secure the anchor. A friend of ours suggested a turnbuckle, so I went to ACE Hardware and bought a $4.50 steel turnbuckle for a proof of concept fitting. The steel turnbuckle would probably rust right before our eyes out on the ocean, so I found a permanent stainless steel turnbuckle online ($17.00). The website had a minimum order of two, but that's ok. I wouldn't be surprised if we donate one to the ocean someday. We'll have a backup.
 |
| Proof of Concept Model |
 |
| Final turnbuckle |
Changing Coolant on a Yanmar 4JH3E Diesel Engine
We've had our boat for two years now, and we have put 500 hours on the engine. It's actually overdue, but the time came to replace the coolant. The coolant on the Yanmar 4JH3E should be replaced every year, or 250 hours. Our engine had the Yanmar brand coolant (YG30R), but we couldn't get a hold of any without paying shipping charges, so we researched an alternative. Initially, we found a suitable replacement with Havoline Extended Life Coolant, and this is what we put in the engine. After further research though, we think next time we will use either Texaco or Shell "ELC" coolant because both brands have added nitrite and molybdenum for protection against pitting and erosion. The engine has three drain cocks: 1. On the cylinder block, on the port side aft. 2. Underneath the fresh water pump. 3. The exhaust manifold. I saved a plastic water bottle to be able to drain the old coolant in tight spaces. After draining coolant from all the drain cocks, I filled the engine with distilled water and ran it until it reached operating temperature. You do this so the thermostat opens up and the cooling pump moves coolant through the heat exchanger, therefore cooling the coolant with sea water (exchanging heat). This gets the coolant inside the heat exchanger moving so you can drain it with the distilled water. If you were going from green coolant (Ethylene Glycol ) to the pink/red/orange stuff (Dexcool), you may want to flush with distilled water a few times, since the two types of coolant are incompatible. When mixed together they form a gel-like substance that stops coolant flow and consequently the engine overheats. Since I switched from Yanmar Dexcool to Havoline Dexcool, I only flushed with distilled water once. Many boat engines have a portion of the coolant circuit diverted to a water heater. When draining, you can ensure the coolant in the water heater circuit is drained by disconnecting from the pump and blowing the coolant into the engine. You need to be careful because coolant is poisonous. After draining the distilled water with the leftover coolant, fill the engine with coolant. Make sure the coolant is either pre-mixed (ready to go in) or concentrated (mix yourself). The Havoline was concentrated, so I mixed with 50% distilled water and 50% coolant. After filling with coolant through the pressure cap, run the engine with the cap off until the thermostat opens. When this happens, the coolant level will drop. Fill to the top again and close the cap. Never open the cap on a hot engine.
During the project I replaced a portion of the coolant hose because the rubber was cracking a little.


During the project I replaced a portion of the coolant hose because the rubber was cracking a little.


16 December, 2012

17 November, 2012
August Cruise Analysis
I spent some time going over our tracks from our August trip, so I could see our average speed. We did all our projections based on 5 knots, and we always seemed to arrive early. The spreadsheet shows our average speed is actually lower. Also, our slowest leg was from Garrison Bay to Port Angeles. At the time it seemed like we made really good time on that leg. I'm a little surprised by this data.


25 October, 2012
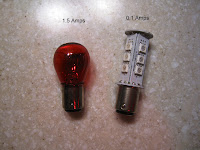
Replacing Bulbs with LEDs
We have been replacing our old light bulbs with LEDs. Not only do they use less energy, but they are brighter, especially the red ones (for night time). Our overhead light fixtures take the bayonet style base, so we found these LEDs that fit the existing fixtures. The LEDs use 0.1 Amp. The Halogen uses 1.5 Amp. The picture really doesn't capture how much brighter the red light is.

 |
| Before |
 |
| After |
13 October, 2012
Lighthouse 1501 Series Motor Maintenance
Motor Maintenance
You will need:
Set of hex allen wrenches, 1/8, 1/4, 3/16"
7/16" 3/8" drive socket tool
Flat blade fine tip screw driver and flat standard screw driver
Razor blade
A medium heat source (heat gun)
Tube of GE clear silicone
Two 6203 RS sealed bearings
Scotch Brite pad for cleaning
Mild solvent or ISO alcohol for cleaning
Rubber mallet
One 2" PVC pipe coupling or piece of 2-2 1/2" non-magnetic tubing 3 - 4" in length
Four straightened paper clips or .06 diameter straight stiff wire 2" long
Permatex
Small bearing puller
3/4" small plastic pipe
Split the project into two days to allow time for silicone to cure.
Shut off power to windlass. Remove the two 3/16" socket head cap screws on the top of the black adapter housing. Using a heat source, raise the temperature of the adapter housing until the silicone bond is broken and the adapter housing can be removed. Clean the old silicone from all surfaces, adapter housing, as well as top of motor - this takes some time and is messy.
Motor is now free to slide off of the stainless steel downtube. The drive shaft components should all be lubricated when reassembled with an anti seizing lubricant. We used Permatex. Remove the large power conductors from posts at bottom of motor.
At the other end of the motor is the urethane motor terminal cover. Mark with a pen the location of the lower motor plate to the outer motor housing for reasembly purposes. It is wise to note the circular orientation of the motor boot to the motor so that the large electrical conductors realign themselves when you reinstall the motor. Remove the large clamp that goes around the cover and slide the motor terminal cover off. Clean any silicone sealant from the motor terminal cover.
There are two 7/16" head bolts which go through the length of the motor and clamp the motor together by screwing into the threaded motor end cap, remove these (turning counter clockwise) screws and withdraw them from the motor.
The motor end caps are now ready to separate from the middle field case. By striking the motor shaft with a soft mallet and holding onto the center motor case the brush holder end plate will be disloged and the upper motor end plate can be removed from the top of the motor.
With the top removed you can view the armature, at this point the brush holder end cap is still secured to the other end and held in place by the spring pressure of the brushes to the commutator. Do not remove the brush holder mechanism yet.
Place the PVC pipe coupler against the exposed armature and over the shaft end of the motor and place your other hand on the brush plate end, so as to hold the parts in column. The case will be held to the armature by the magetic field. While holding the parts together in column, turn them vertically with the non-magnetic tubing placed on a flat substantial surface. Using both hands grab the field case and slide down over the non-magnetic tube. The armature can now be separated from the magnetic field with the brush holder still attached.
You will see four holes visible externally from the end of the brush holder end cap. Remove the the silicone which is now filling these holes as they are the means of maintaining tension on the brush springs during reassembly. Take note of the brush spring and it's orientation.
Using the four straightened paper clips or wire, insert them into the holes. Retract the brushes all the way back in their brush retainers and push the wire through to engage the holes in the brush holder, thereby retaining the brushes under tension. The end cap can now be removed. Note: if the bearing stays mated to the armature, it can be removed using a small puller. We had to grind the puller down in order for it to fit. Make certain you do not loose the wave spring under the bearing.
Clean the armature using a mild solvent. It is preferred to use new 6203 ZZ style bearings when reassembling the motor to insure trouble free operation. We couldn't find the parts easily online and discussed needing parts for the maintenance with Hal (also a 1501 owner) at Mariner Supply (Go2Marine) and they created a kit for the Lighthouse windlass maintenance. You can order the parts here: http://www.go2marine.com/search.do?q=lighthouse. The shaft that the bearing fits to is .6693" so a piece of 3/4" plastic pipe can be used to relocate the bearings on the armature.
With the four straigtened wires holding the retracted brushes against the springs, blow or remove any dust from the brush holder mechanism. If corrosion is experienced in the brush holder mechanism (we did not have that), remove the wires and remove brush springs and emerse in white vinegar until gone. Then, rinse, dry and reassemble brush holder plate. Install brush holder mechanism on armature, making certain that wave spring is placed in bearing receptacle before bearing is inserted. Once brushes plate mechanism is installed on armature you can remove the wires. However, you can wait until final assemly to remove clips. Apply a small amount of electrical grease to the sides of the brushes.
Apply a bead of silicone to the mating surface of the brush holder/case junction. Seal the holes in the brush holder end, which you used for the paper clips/wire, with silicone.
Clean the magnet case of dust and inspect magnets for any cracking or looseness.
The reassembly is just the previous procedure reversed taking care to use silicone between mating surfaces, such as between the adapter housing and top of motor. Make sure and leave plenty of time for the silcone to dry before installing or it's a real mess.
Now align the timing marks and secure the two long motor connecting screws by only a thread or two. With the motor brush plate still not tight, apply a bead of silicone sealant around the motor shell to end plate joint - this can get messy depending on how much access you have to the motor. Now proceed by tightening the two screws, frequently turning the armature to make certain no binding can occur.
Install the urethane boot to its marked orientation using silicone sealant and tighten the sealing clamp - messy!
The motor is reinstalled.
We still have to complete the rest of the maintenance, but will wait for drier weather.
 |
| Some of the items you will need for the project |
 |
Motor Installed |
 |
| Remove the cables from the base |
 |
| Remove clamp |


 |
| Wires in the holes |
18 August, 2012
Martin Slough, WA to Portland, OR
Sunday 8/18/2012 - Martin Slough, WA to Portland, OR
We left early on Sunday morning trying to avoid yet another low tide. We arrived at our dock in the marina around 1300. It was the end of our adventure but just the beginning of our dream.
There were boat crashes, shouting and swearing, and rough weather, but we also found - new friends and appreciation for the ones we have; renewed faith in Bliss, the engine and auto pilot; respect for the ocean and nature; inner strength and confidence; and a greater connection between the two of us. We can't wait for the next adventure!


17 August, 2012
Martin Slough, WA
Saturday 8/17/2012 - Martin Slough, WA
We thought about heading back to the marina on Saturday, but the weather was lovely and we didn't want to end our vacation. We decided to stay another night. We all rode our dinghies to Sand Island and had a nice hike on the island. Later that day we all had happy hour on Bliss.
16 August, 2012
Martin Slough, WA
Friday 8/16/2012 - Martin Slough, WA

15 August, 2012
Astoria, OR to Martin Slough, WA
Thursday 8/15/2012 - Astoria, OR to Martin Slough, WA
We hustled in the morning, pre-dawn, to get Bliss out of the marina before the water levels would trap us in there until later in the day. The sunrise was beautiful. We noticed activity on the tankers that were anchored on the river at Astoria as we passed by. All of them cruised by us going up river later in the day. It was a long motor up the Columbia. The weather was beautiful. It was ideal for airing out the boat and cleaning. The worst part of the day was the constant barrage of biting horse flies. We have to thank Bill and Yvonne for the fly swatters, (along with all of their advice) they came in handy more than once on the trip. We decided to stay at Martin Slough before going home and stopped at Rainier on the way there to inflate the dinghy and pick up a few things at the store. We arrived in Martin Slough in the late afternoon. There was only one other boat there when we set the anchor and they left shortly after we arrived. As the sun set we had the slough to ourselves - it was so peaceful. What a nice way to wind down from our trip. The skies were clear and the air warm - perfect for stargazing.


14 August, 2012
Subscribe to:
Posts (Atom)